Have you ever tried to use a telescope just to throw up your hands in frustration? That was me until now! I decided to do some research on selecting a telescope, and learn how to view the stars… and now I’m an expert! LOL! Well, I know enough to point a beginner in the right direction!
First I will tell you, in my opinion, the most important things to look for in a telescope, without breaking your budget!
1 – High Magnification Capabilities – Make sure the telescope you select can achieve 450X Magnification. I chose a long tube, and the length affects the magnification capabilities, but many short tubes can achieve 450X magnification too.
This is the telescope I chose and I got it to work right out of the box! Around $200!
Telescope 90mm Aperture 900mm – Vertisteel AZ Mount Base, High Precision Adjustment, Magnification 45-450x, Wireless Remote, Phone Adapter – Ideal for Astronomy Enthusiasts and Beginners (White) https://amzn.to/3Dlmrfx paid partnership.

2 – Get a tripod with a very sturdy base. A base that wobbles makes star-gazing impossible!
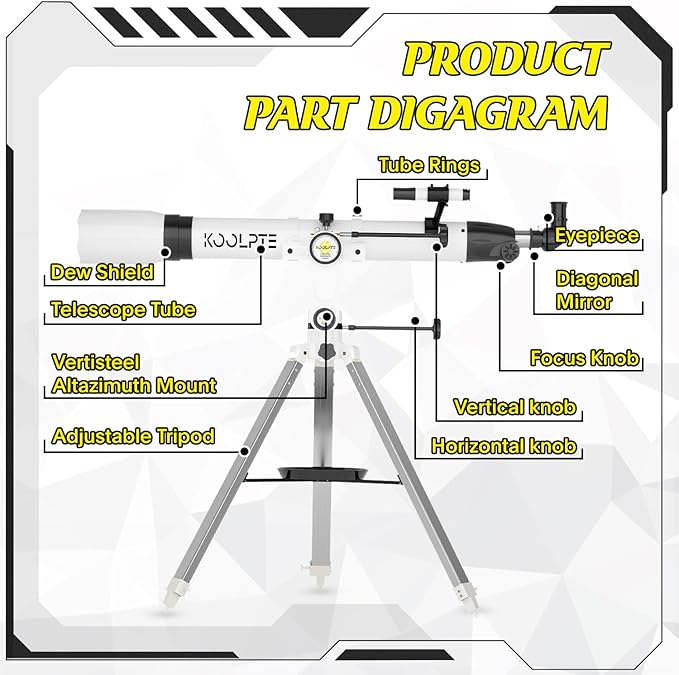
3 – Make sure your telescope has adjustment knobs that can adjust the tripod horizontally and vertically VERY SLIGHTLY for high precision adjustment. This is because when you are viewing a star, and that star moves out of your field of vision, you will want to adjust the telescope very slightly to keep the star in your view.
The View Finder on this telescope (see it right under the word “Tube Rings” on the diagram) is built in and no adjustment is needed! Love that!
TIP: When you are looking for a star in the view finder, KEEP BOTH EYES OPEN! Stand back from the view finder and look through with both eyes, and adjust the telescope until the star/moon is the the middle of the X.)

And make sure the mount glides smoothly both vertically and horizontally. Trust me, you don’t want to lose a star one you have it in your view! This Altazimuth mount base even allows you to easily adjust the telescope to view stars directly overhead!

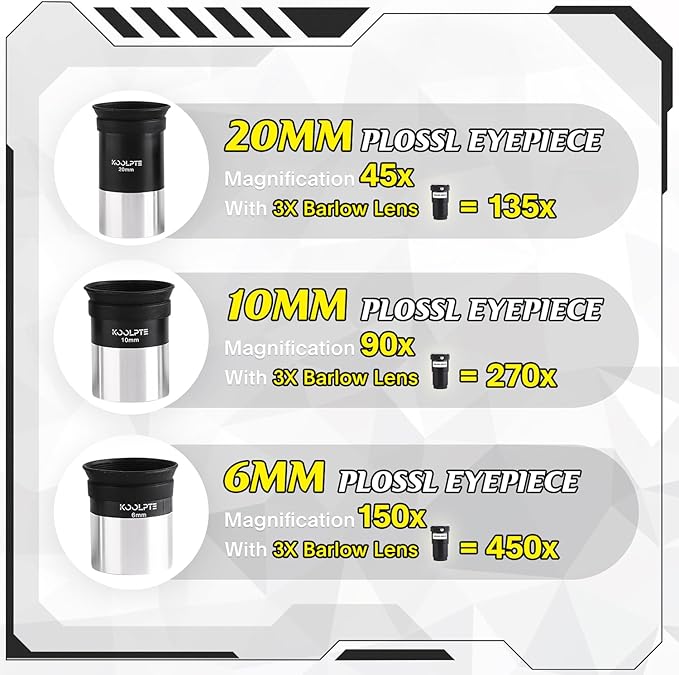
These are the lenses that come with this tripod. Once you find the star in the view finder, insert the 20MM lens into the eyepiece. You will likely need to adjust the focus knobs back and forth until the star is clear in your view.
TIP: Start with the lowest magnification lens, to find the star in your view. Adjust vertically and horizontally with the adjustment knobs until the star is right in the middle of your view. Then you can reduce to the 10MM lens for greater magnification, and then to the 6MM lens to see the star more closely. Be ready to adjust the adjustment knobs as you move to the 10MM and 6MM lenses… with enable higher magnification. Because the star will move out of your view quickly.
And a Barlow lens also comes with this telescope! When you combine one of the other lenses with the Barlow lens, the magnification is tripled!

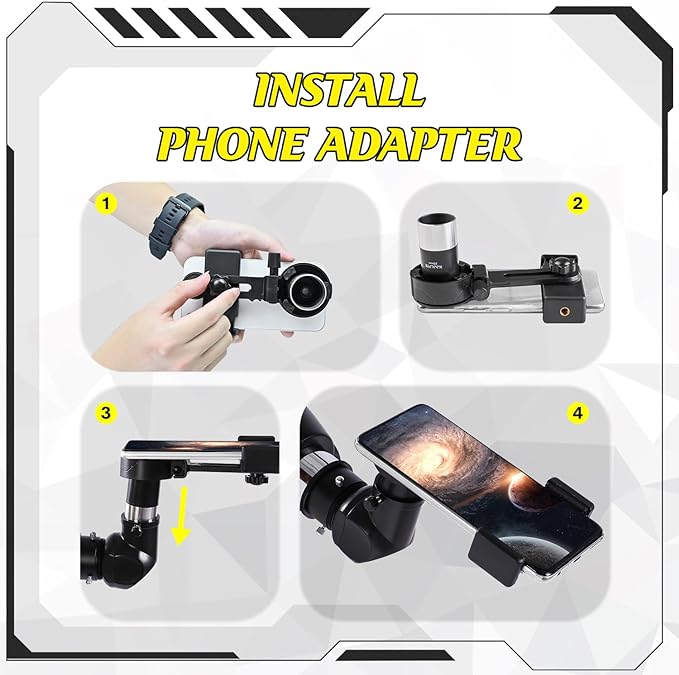
This telescope has an adapter to attach a cell phone to take videos and still shots! I am still working on that… really excited to share what I see with everyone!

On my first night, after some trial and error, I was able to find the moon and then I was able to find Jupiter (Melchizedek)!! On my second night I found Sirius!
TIP: The tube needs to adjust to the climate. This might take 20-30 minutes, so be patient.
TIP: When you view at high magnification, even your breath or talking can distort the view of the star. So no breathing or talking! LOL!
TIP: If you are viewing a star almost directing overhead, set up the telescope close to the tripod leg on the right, so you have plenty of space to adjust toward the left as the stars more toward the right across your field of vision. (That might not make sense now, but it will later.)
This is Sirius at high magnification – (likely a 6MM and Barlow lens combo). WOW!